QLab Troubleshooting
Figure 53’s QLab is a very reliable piece of software, but occasionally some things can happen that can stop it working as intended. This page will help you out if you’ve loaded up an existing workspace and it’s not doing what you thought it should.
QLab indicates most common problems when you load a workspace by showing an error report (the ! inside a triangle on the bottom right of the window), and by putting a red cross next to any cue that has a problem. The red cross looks like this:


If you hover your mouse pointer over the red cross it tells you what the problem is. However most of the time it will display this:
“A cue in the group is broken” or "a cue inside this group is broken"
A broken cue within a group, in QLab version 4

A broken cue within a group, in QLab version 5
Often a cue-list contains groups of cues, which are indicated by green or light purple rectangles. These are just ways of keeping things tidy in the cue-list. But more often than not the problem is with something inside the group.
You’ll notice a small triangle or arrow to the right of the cue number and to the left of the cue title. In the image above, it’s between the cue number “1” and “Preshow Station Atmos”.
Click on the arrow, and the group will open up to reveal its contents.

Now you can see the contents of each Group, and you can see that there are red crosses next to any cues that have issues.
When you hover your mouse over the Red Cross, it will show you an error message for that cue. Below are instructions for a variety of different error messages.
Hover your mouse over the red cross to see and follow the instructions below that correspond to the error message that is displayed when you hover your mouse over the cross.
If you can’t solve your issue using the instructions below, there are a few options to try:
Technical support by email from Figure 53 is excellent, fast and free: https://qlab.app/support/
There is a very active Google Group where you reach out to other users of the program, or search the archives for previous similar enquiries: https://groups.google.com/g/qlab
There is a very active Facebook group too: https://www.facebook.com/groups/488915331311641/
“This cue does not have a valid audio output device”, “No audio device”, or "Issue with audio output patch" error message

No audio device error message in QLab v5

No audio device error message in QLab v4

No audio device error message in QLab v3
The “This cue does not have a valid audio output device”, “No audio device” or “issue with audio output patch” error message indicates to us that QLab can’t find the sound card / audio interface that it was using to send sound out of the computer to the sound system.
Sound cards (aka audio interfaces) are typically a separate hardware device that are connected to your computer using a USB, Firewire or Thunderbolt cable.
There are also some forms of “virtual” sound card, such as Dante Virtual Soundcard (DVS), where there isn’t a separate hardware device, but your computer is connected to the sound system using an Ethernet cable. Relatively simple shows might connect using the headphone output socket of the computer.
If your system has a separate sound card
The first step to try whenever there is a problem is to shutdown your computer, turn the power off to the computer and any other devices attached to it, and turn it back on. It’s ridiculous that this step often fixes 90% of problems!
Make sure the sound card is connected to your computer, and that the cable is fully inserted. It’s not uncommon, particularly on computer systems that are moved around for the cable to pop out a few millimetres, and it can look like it’s connected but isn’t properly inserted.
Make sure the sound card is turned on - are there any LED lights or displays on it that should be illuminated? Some sound cards plug into a mains socket, whilst others get their power from the computer they are attached to. Try turning the sound card off and back on again.
Can your computer “see” the Soundcard? Go to the Apple menu in the very top left of your computer’s display, and select System Preferences from the menu. In the window that appears, click on the Sound icon, then on the Output tab. Can you see the make/model of your Soundcard listed in this window? If not, then there is a problem with the hardware connection between the computer and the sound card (such as the cable), or the software driver for the sound card is not working properly (and may need to be reinstalled).

If your computer can “see” your Soundcard, i.e. it is listed in the System Preferences>Sound>Output window, then we know that the cable between the computer and the sound card is working, and that everything hardware wise is probably OK.
Assuming QLab is still displaying the “No audio device” error after you carried out the above troubleshooting steps, QLab might have forgotten it’s patch to the sound card. Skip to the section below “Re-assign QLab to the sound card”
Be aware, with some sound cards the volume of everything you play can be adjusted using the volume keys on the top of your keyboard. Make sure the volume is always at the same level whenever you are playing back sound. I normally turn it up to full using the keyboard volume buttons, then turn it down 3 button presses. (Having it at full can cause the sound to distort)
If your system has a “virtual” sound card
The most common form of virtual sound card is Dante Virtual Soundcard. This connects your computer to the sound system using a piece of software, called Dante Virtual Soundcard (DVS) and a network cable. The two steps to diagnose this problem is to check the hardware (that your computer is connected to the network), and to check the software.
The first step to try whenever there is a problem is to shutdown your computer, turn the power off to the computer and any other devices attached to it, and turn it back on. It’s ridiculous that this step often fixes 90% of problems!
Make sure that your computer is connected correctly. Some computers have a Ethernet network port built in to them. Some computers do not, and use either an adaptor or hub to connect your computer to the network. Sometimes your computer will be connected to a network switch (a sort of junction box where lots of networks are connected), or might be connected directly to a mixing desk. Ethernet plugs can easily pull out a few millimeters from the socket so they look like they are connected but won’t work. Ensure all the cables are properly plugged in by giving them a little push inwards. There should be two lights above the ethernet plug at the other end of the cable indicating the cable is working - there probably won’t be any lights at the computer end of the ethernet cable. If there are the two lights above the network cable at the other end of the lead, then it’s probably not a hardware problem.

In this image, the blue and red cables are working properly, as indicated by the two green lights above them. There is a problem with the black ethernet cable, indicated by the absence of lights above the plug.
Next, let’s check the software side of things. Open the application “Dante Virtual Soundcard”, which will normally be in the Applications folder of your computer.


DVS is not active (indicated by the Start button being present). Ensure your ethernet port is selected in the Network Interface drop-down selection box, and click the Start button.

DVS working correctly (indicated by the Stop button being present)
When DVS opens, it will show a window like the one above.
If the Network Interface drop down is blank, DVS is not active. Select the network interface that is connected to the sound system.
If the button in the bottom right says “Start” this indicates that DVS is not currently active. Click the Start button to turn DVS on. This may solve the problem - check if QLab is now happy.
If DVS is working correctly, the drop-down selection boxes will be greyed-out and there will be a Stop button in the bottom right of the window,
Assuming QLab is still displaying the “No audio device” error after you carried out the above troubleshooting steps, QLab might have forgotten it’s patch to the sound card. Skip to the section below “Re-assign QLab to the sound card”.
If your system is connected using the headphone output socket on your computer
The first step to try whenever there is a problem is to shutdown your computer, turn the power off to the computer and any other devices attached to it, and turn it back on. It’s ridiculous that this step often fixes 90% of problems!
Check that the cable plugged into your computer is fully-inserted.
Assuming QLab is still displaying the “No audio device” error after you carried out the above troubleshooting steps, QLab might have forgotten it’s patch to the sound card. Skip to the section below “Re-assign QLab to the sound card”.
Be aware, if you are using the headphone output, the volume of everything you play can be adjusted using the volume keys on the top of your keyboard. Make sure the volume is always at the same level whenever you are playing back sound. I normally turn it up to full using the keyboard volume buttons, then turn it down 3 button presses. (Having it at full can cause the sound to distort).
Re-assign QLab to the sound card
Open QLab’s Workspace Settings. There are three ways to do this: either press Command-Comma on your keyboard; click the Cog icon on the bottom right of QLab’s main window, or select Workspace Settings from the Window menu.
Click the Audio tab on the far left side of the Workspace Settings window.

Open the Workspace Settings window, in QLab v5

Click the Audio tab on the left hand side of the Workspace Settings window, in QLab v5

Open the Workspace Settings window, in QLab v4

Click the Audio tab on the left hand side of the Workspace Settings window, in QLab v4
Most shows just use Audio Patch 1. More complex shows may use multiple sound cards, but these are rare.
Click on the drop-down selection box to the right of Audio Patch 1, where it currently says “No selected device” or “(no device)”.
Select the sound card that is connected to the sound system from this drop down selection box.
Click Done in the bottom right of the Workspace Settings window.
You’ve now patched QLab to the sound card, so it should no longer display the error message “no audio device”.
Try playing some cues to make sure that audio is working as expected.

Selecting the sound card (or virtual sound card) you are using to connect your computer to the sound system.
“This cue does not have a valid audio file”, “Invalid audio file” or "missing audio file" error message

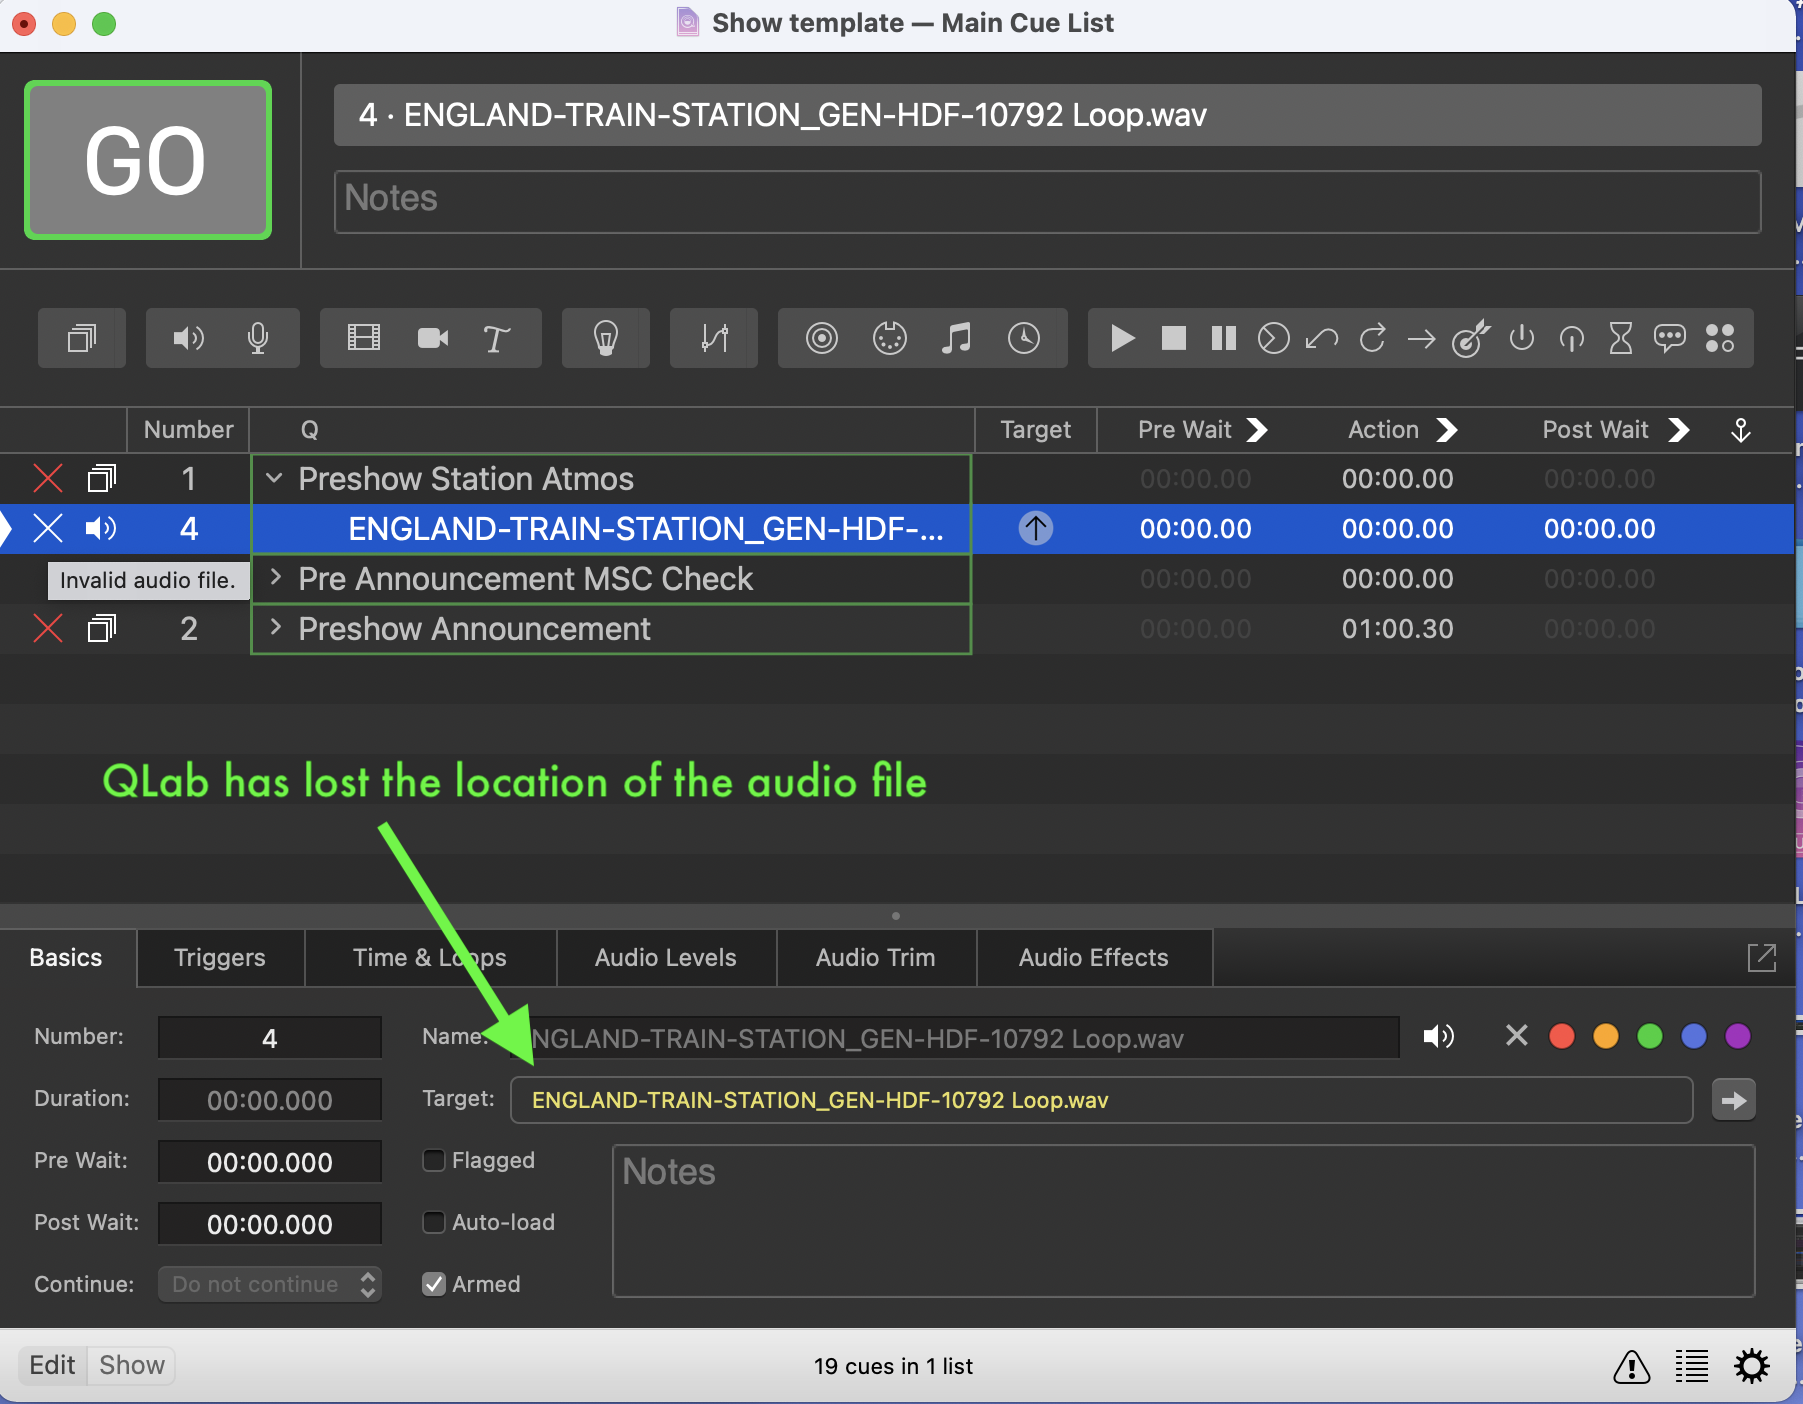
Missing audio file error message in QLab v5

Invalid audio file error message in QLab v4

This cue does not have a valid audio file error message in QLab v3
The errors “This cue does not have a valid audio file”, “Invalid audio file” or “missing audio file” normally indicate QLab cannot find the audio file for this cue.
This can happen if you’ve moved the audio files to a different location on your hard drive. It can also happen when you move QLab files from one computer to another.
QLab v4 and v5 work a little bit differently with audio files.
QLab v5
With QLab v5, when you first save your workspace, QLab will copy all the files your show uses into one folder. After that point, any files you put in your workspace will be automatically copied into that folder as well. This essentially means the folder that is created when you save your QLab workspace will always have all the files you need in it. (Prior to saving your workspace, your files are left where they originally were). This can be turned on and off in Workspace Settings > General > File Management
To fix a missing audio file, start by looking in the Basics tab of the Cue Properties window. QLab gives you an indication of where it thinks the audio file should be, displayed in yellow in the Target field. Normally this will be in your show’s workspace folder.
This file path might be in the form “audio/ENGLAND-TRAIN-STATION_GEN-HDF-10792 Loop.wav”. This indicates QLab is expecting to find the audio file in a folder called “audio”, and that the folder called “audio” is in the same place on your hard drive as the QLab file itself. The easiest method to solve this problem is simply to move the files to this location and QLab will then automatically find it.

This is the folder where QLab v5 is expecting the Audio file to be, but it cannot find it there.

In Workspace Settings > File Management, you can change whether QLab automatically copies the files your show uses in your workspace’s folder. Unless you have good reason otherwise, this is best left turned on.
QLab v4
QLab v4 will always leave your files where they originally were, unless you “Bundle” the workspace. The Bundle Workspace process will then copy all the files your show uses into one folder. This makes it very handy to backup and copy your show from one computer to another. If you haven’t bundled your workspace though it makes it a lot easier for your workspace and the sound files you use to become separated, especially if you are using USB memory sticks, external hard drives and network drives.
To fix a missing audio file, start by looking in the Basics tab of the Cue Properties window. QLab gives you an indication of where it thinks the audio file should be, displayed in yellow in the Target field.
This file path might be in the form “audio/ENGLAND-TRAIN-STATION_GEN-HDF-10792 Loop.wav”. This indicates QLab is expecting to find the audio file in a folder called “audio”, and that the folder called “audio” is in the same place on your hard drive as the QLab file itself. The easiest method to solve this problem is to move the files to this location. BUT MAKE SURE THAT YOU QUIT QLAB WHILST YOU MOVE THE FILES TO THE CORRECT LOCATION.
In QLab v4, If the file path just shows “ENGLAND-TRAIN-STATION_GEN-HDF-10792 Loop.wav” QLab knows where the file should be, but it doesn’t tell you where that is! If you know, then you can move the files back to that location. BUT MAKE SURE THAT YOU KEEP QLAB OPEN WHILST YOU MOVE THE FILES TO THE CORRECT LOCATION. Once you’ve moved the files to the correct location you should see the text in the Target field turn from yellow to white. You’ll then need to quit and re-open QLab to complete this process.

This is the folder where QLab v4 is expecting the Audio file to be, but it cannot find it there.
When QLab v4 just displays the audio filename, and not which folder it should be in, it means QLab doesn't know where to look for the audio file.
If you struggle to move the audio files back to the location QLab is expecting, then you can manually tell QLab where the file is. Select the audio file in the cue-list, then press T (for Target), or click the Target arrow icon in the cue list

Click here to re-target this cue to the correct audio file
The best way to transfer QLab v4 files (with its accompanying audio and video files) from computer to computer is to use the Bundle Workspace function. This feature will create a folder that contains your QLab file, with sub-folders that contain all the audio and video files used in your QLab file.
"No MIDI destination" or "No MIDI patch" error message

“No MIDI patch” error message in QLab v5

“No MIDI destination” error message in QLab v4
The “No MIDI destination”or “No MIDI patch” error message indicates to us that QLab can’t find the MIDI interface that it was using to send MIDI or MSC commands out of the computer. These MIDI or MSC messages are sent to other parts of the sound system, or may be controlling the lighting or video systems. The MIDI interface may be a separate hardware device (or it might be part of a sound card / audio interface) that is connected to your computer using a USB, Firewire or Thunderbolt cable.
There are also some forms of “virtual” MIDI interfaces, where there isn’t a separate hardware device, but your computer is sending MIDI or MSC to other devices using an Ethernet cable.
If your system has a separate MIDI interface, or has a MIDI interface built into a sound card
The first step to try whenever there is a problem is to shutdown your computer, turn the power off to the computer and any other devices attached to it, and turn it back on. It’s ridiculous that this step often fixes 90% of problems!
Make sure the MIDI interface / sound card is connected to your computer, and that the cable is fully inserted. It’s not uncommon, particularly on computer systems that are moved around for the cable to pop out a few millimetres, and it can look like it’s connected but isn’t properly inserted.
Make sure the MIDI interface / sound card is turned on - are there any LED lights or displays on it that should be illuminated? Some sound cards plug into a mains socket, whilst others get their power from the computer they are attached to. Try turning the sound card off and back on again.
Can your computer “see” the MIDI interface? Open the application “Audio MIDI Setup” (which is on your hard drive, in a folder called Utilities, in your Applications folder. When it’s opened, it may show the MIDI Studio window. If not, in the Window menu, click Show MIDI Studio. Can you see the make/model of your MIDI interface / sound card in this window, and it’s not greyed-out? If it’s greyed-out, then there is a problem with the hardware connection between the computer and the MIDI interface / sound card (such as the cable), or the software driver is not working properly (and may need to be reinstalled).


MIDI devices that aren’t connected to the computer will be visible here, but will be “greyed” out.
Note, the IAC driver is a way of sending MIDI to other applications on the same computer as QLab, it does not send MIDI to other devices
If your computer can “see” your MIDI interface / sound card, i.e. it is not grey ed out in Audio MID Setup>Window>Show MIDI Studio window, then we know that the cable between the computer and the MIDI interface / sound card is working, and that everything hardware wise is probably OK.
Assuming QLab is still displaying the “No MIDI destination” error after you carried out the above troubleshooting steps, QLab might have forgotten it’s patch to the MIDI Interface.
Re-assign QLab to the MIDI interface
Open QLab’s Workspace Settings. There are three ways to do this: either press Command-Comma on your keyboard; click the Cog icon on the bottom right of QLab’s main window, or select Workspace Settings from the Window menu.
Click the MIDI tab on the far left side of the Workspace Settings window

Open the Workspace Settings window, in QLab v5

Click the MIDI tab on the left hand side of the Workspace Settings window, in QLab v5

Open the Workspace Settings window, in QLab v4
Click the MIDI tab on the left hand side of the Workspace Settings window, in QLab v4
Most shows just use MIDI Patch 1. More complex shows may use multiple outputs, but these are rare.
Click on the drop-down selection box to the right of MIDI Patch 1, where it currently says “No selected device” or “(no device)”.
Select the MIDI Interface / sound card that is connected to the sound system from this drop down selection box.
Click Done in the bottom right of the Workspace Settings window.
You’ve now patched QLab to the MIDI interface / sound card, so it should no longer display the error message “no MIDI destination”
Try playing some cues to make sure that MIDI / MSC is working as expected

Selecting the MIDI Interface (or virtual sound card) you are using to control other devices.
Note, the IAC driver is a way of sending MIDI to other applications on the same computer as QLab, it does not send MIDI to other devices.